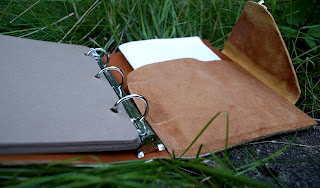
 The Dilemma: I need a datebook/ planner/ calendar, whatever you choose to call it. My summer is filling up faster than I can believe, and there are no store-bought planners that start in June. I’ve checked office supply stores and bookstores with no luck.
The Solution: If you can’t find it, make it. All you need is:
-a small binder (one that fits half pages not full pages)
-leather
-scrapbook screws
-cardstock
-sewing machine (with leather needles or use an industrial leather sewing machine)
-a closure
 First I cut the rivets that bound the 3-ring binder to the cover. They are tough to dig out, but as long as the 3-ring binder stays intact, that’s all you need.


 Next I used the cover of the binder as the template for the leather cover. I got the leather at a fantastic surplus store, Ax-Man, in St. Paul. I decided to make the rough side of the leather the outside of the planner. I liked the rugged look of it, and it will show wear less.
 I then cut two holes in the binding of the leather cover for the screws. You can pick up scrapbook screws at Michael’s or a scrapbooking specialty store. They are the right size and easy to apply.
 Using the smooth side of the leather for contrast I attached a triangular piece for the flap to keep the planner closed. The closures I used are tough to find. I think they are called “sabertooth” closures.


 I also added a pocket in the back to keep all my little notes somewhat organized.
 Now to the contents. I made a one-page calendar for each month and made a table for each individual week. I used cardstock for these pages. I think it holds up a lot better than printer paper (but I applied hole reinforcements anyway). The pages are easy to pop into the 3-ring binder.
 For some reason the ink printed red on the brown cardstock instead of black like I had on the computer. Sometimes malfunctions add interest :)
 I also added a notes section at the back, which has already come in handy for spur-of-the-moment to-do lists and the like. Those seem to pop up quite often!
 I used a pyrography tool to burn my initials into the inside cover of the planner.
And there you have it—a rugged yet functional planner.
And remember…

That's so cool, Kiah! How long did it take you to make it?
ReplyDeleteThanks Emma! Start to finish it probably took me 4ish hours.
ReplyDeletejust linked this article on my Facebook account. it’s a very interesting article for all.
ReplyDeleteLeather Diary
Awesome! Thanks so much! Glad you like it!
DeleteIf anyone is interested, The Leather Guy in Saint Charles, MN (www.theleatherguy.org) sells the closures for this project! They call them "turn lock fasteners". They are hard to find, so I thought I would share!
ReplyDeleteWould you ever sell one? I love it!
ReplyDeleteI love this DIY project, and making your own personalized planner sounds like so much fun.
ReplyDelete